As everyone across the area prepared for Hurricane Sandy this past weekend, I had different plans. My priority centered on taking back my house! And by “house,” I mean, “dining room, kitchen, and living room.”
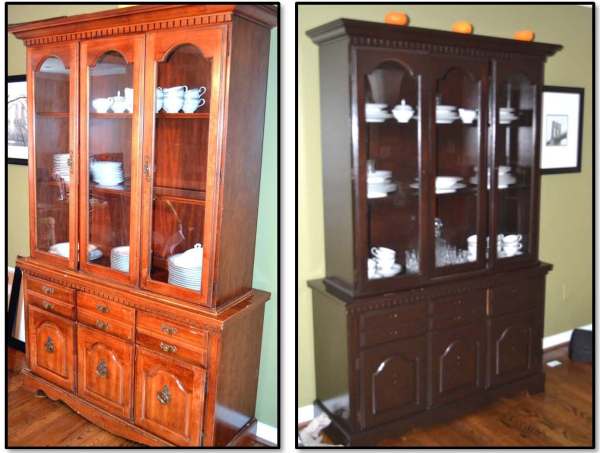
About a week ago, I started a project in the dining room that involved moving items from the dining room to the kitchen, kitchen items to the living room, and so on across the main level of our home. The inconvenience of having our main level in such disarray this past week was the driving force to finishing this project in one week. This “project” I keep mentioning was the transformation of our honey-colored china cabinet to a dark espresso color to match our dining room furniture as shown below.
It all started a few months ago when we decided we needed a china cabinet to display the china we received from Justin’s mother. We initially looked at furniture stores and quickly concluded we did not want to spend a fortune on something we may replace when we eventually redo the kitchen and dining room (of course that priority is quickly falling on the list as well so we may have this china cabinet a lot longer than originally planned).
Anyway, I started looking at Craigslist to see if I could find something that would work. After looking for a few days and regularly coming across items that either clash with the espresso-colored dining room furniture or work but cost too much, I came across a honey-colored china cabinet someone was looking to get rid of for $45! I responded hesitantly, assuming they forgot a digit in the asking price or they already sold it. To my surprise, I learned they had it available and they were only asking $45 for it.
Justin picked up the piece of furniture from a couple who just moved to DC only to realize their new cozy living space did not provide room for a china cabinet. Turns out, this couple moved to DC with the Navy, and what better time to take advantage of perfectly-crafted knot skills than by attaching a massive china cabinet to the top of a car?
Justin miraculously made it home with the cabinet attached to the top, but getting the cabinet down was another story. Justin enlisted the help of some friends to move the cabinet from the top of the car to the dining room. All was going according to planned until someone suddenly slipped and the china cabinet came crashing down. The middle drawer flew out and crashed onto the ground and there were a few other gashes on the base of the cabinet. Justin reluctantly told me what happened, but to his surprise (and mine), I told him we could fix it. I was not planning on building a new drawer or anything technical like that, but we took the face of the broken drawer and some wood glue and attached it directly to the cabinet. We decided it was not worth scrapping the entire piece of furniture because we had one unusable drawer.
For the next few months, the china cabinet stood in our living room, and while we were pleased we had somewhere to place our china other than a moving box stored in the basement, the cabinet never quite fit the look of our dining room. Also, it did not help that the china cabinet came with only three of the four glass shelves it required, so there were multiple factors impacting its ability to “work” with our dining room. Then while perusing Pinterest one day, I had the light bulb moment I was waiting for.
I stumbled upon a link to the Monica Wants It blog that provided a step-by-step tutorial for transforming honey-colored cabinets with a dark espresso finish. This was exactly what our cabinet needed, and surely it was possible to stain furniture just as easily as a bathroom cabinet, right? After reading her tutorial along with her FAQs about the project, I was confident I could tackle this project and perform the same process on a china cabinet, or any piece of wood for that matter.
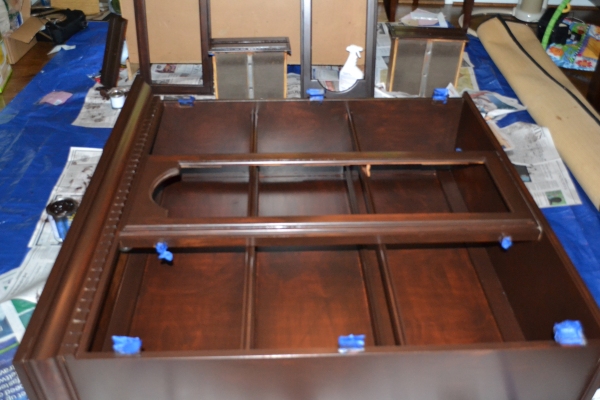
I ordered most of the recommended supplies right down to the brand-specific General Finishes JAVA gel stain from a vendor on Amazon and picked up the remaining items at Home Depot, and I was ready to begin. First, I prepped the room by moving all existing dining room furniture away from the project area and covering the hardwood floors with a drop cloth. Then, as requested by my skeptical husband, I placed newspaper on top of the drop cloth just to “play it safe.” Next, we took the furniture apart and placed it on top of the newspaper-covered drop cloth and I began taking off the hardware. I detached the doors and drawers, wiped down the wood with an all-purpose cleaner, and lightly sanded the wood. Then, I wiped everything down again with a tack cloth to remove any remaining particles before I began the staining process.
I followed the recommended application process by applying latex gloves over my hands and then applying an old sock directly to my latex-covered right hand. Now it was time to dig right into the gel stain! I scooped up a small amount of stain with my sock-covered hand and started applying it directly to the furniture with a “wax on, wax off” method a la Karate Kid. After a few coats using this technique, I decided to read the instructions on the stain can that advised applying the stain in the direction of the grain. C’est la vie.
Here is a look at the project area just before I began. Note the imperfections in the base of the cabinet from the great drop.
Here is a look after the first coat. Already a major improvement, even if it appears a bit streaky. I think I can, I think I can…
 About 24 hours later, I got to work on the second coat. Here is a look after the second coat. Getting better! I think I can, I think I can…
Alas! Another day passed and I finished up the third coat. Here is the cabinet after its final coat of stain. I did it!
Now for the polyurethane topcoat. My less-skeptical-and-now-very-proud-husband took a photo while I was hard at work.
I followed this coat up with another coat to seal the stain. The product recommended two to three coats and my lack of patience got the best of me after the second coat.
After waiting about six hours in between the two polyurethane top coats, I was ready to reassemble the furniture! In the process of placing the glass back in the front doors, one of the edges cracked, but we hope it goes unnoticed unless someone is looking for imperfections. To be honest, if someone is inspecting the cabinet for imperfections, they can probably find them all over my craftsmanship. But Justin and I are both happy with the finished product and we are the ones who have to live with it! Here’s another look at the finished product!
The only remaining step involves replacing the hardware. The cabinet currently stands without any hardware as we continue our search for something the fits the holes from the dated brass hardware yet complements the dining room.
Oh, and another good-news story to the never-ending china cabinet saga – Justin found a local hardware store that could custom-cut a glass shelf for us. For only $10, they cut two shelves for us – one to replace the missing shelf and one as a back-up!
When we replace the hardware, I will post an update. But for now, I have my dining room back, so my weekend was a success. Here’s hoping Hurricane Sandy is gentle on us…


The pictures are great! WHAT A DIFFERENCE! Hope you are all doing fine and still have electricity and a dry house!!! Love, Mom
Emily, Just looking at this again — this was really a huge project!!! Wow! Love the pumpkins on top of the cabinet
Thanks, mom! It was fun and definitely gave me that sense of accomplishment we love so dearly 🙂 Oh, and the pumpkins were courtesy of the Falloween event we took Alister to this past weekend. Figured they would have better luck making it through the hurricane indoors than outdoors.
Just stopping by to invite you to My Wednesday Linky party. http://diycraftyprojects.com/2012/10/whatcha-work-up-wednesday-linky-party-6.html
Looks amazing! On another note, I also LOVE the green color on your walls!!!! can you tell me what color that is??
Thanks, Jen! It has come to my attention that the green color on the wall appears in two different shades, depending on the photo you see. The green on the walls with the honey colored china cabinet is somewhat discolored in the photo. The color we actually have on our walls looks more like the photos with the espresso cabinet (the last photo in this post), so hopefully that was the color you were referring to 🙂 If it was, it is Oregano Spice by Behr.
That IS the color Inwas referring to! thanks so much!!
What an awesome job, you’ve re-inspired me! After looking at countless websites and becoming discouraged by the results I saw, too dark and/or too shiny, I had all but given up on the project and resigned myself to living with our light colored cabinets, but then I saw your page – wow, nice job! I’ve already added the gel stain to my wish list on Amazon. Would you mind emailing me the name of the poly you also used? Also, do you have any other pics you wouldn’t mind sending too? Thank you so much! Oh, my email address (it’s okay, it really is a “temporary” one so I don’t mind putting it out here … I’ll omit the ‘at’ sign so as to fool any spiderbots) is jl.temp2 at gmail dot com.
Hi John and my apologies for the delayed response. I’m finally getting back around to the blogging thing and came across your message. First of all, thanks for the kinds words regarding this project! Regarding the gel stain, I used General Finishes gel top coat, which you can find here – http://www.woodcraft.com/Product/826989/General-Finishes-Clear-Satin-Topcoat-Gel-12-Pint.aspx?refcode=10INGOPB&gclid=CjwKEAiAx4anBRDz6JLYjMDxoQYSJAA4loRm2IlWlMwEHh0KV0khsTOhGAY7oMHZx58frX6qcssEBhoCYTjw_wcB
Hope that helps! Let me know if you have any other questions and I’ll try to get back to you in a much timelier manner. Thanks!-